V5.22 Raises the Limits: More Virtual Devices, More Thermostat Plugins, Easier Sharing
With the eWeLink app V5.22, Prime members get higher limits for virtual devices, thermostat plugins, and device sharing.

Maintaining a comfortable indoor temperature can feel like a constant chore—especially when the weather is unpredictable. The Thermo Plugin, introduced in eWeLink App V5.18, offers a smarter solution. Automating your heating and cooling routines helps you create a cozy, energy-efficient living space with minimal effort.
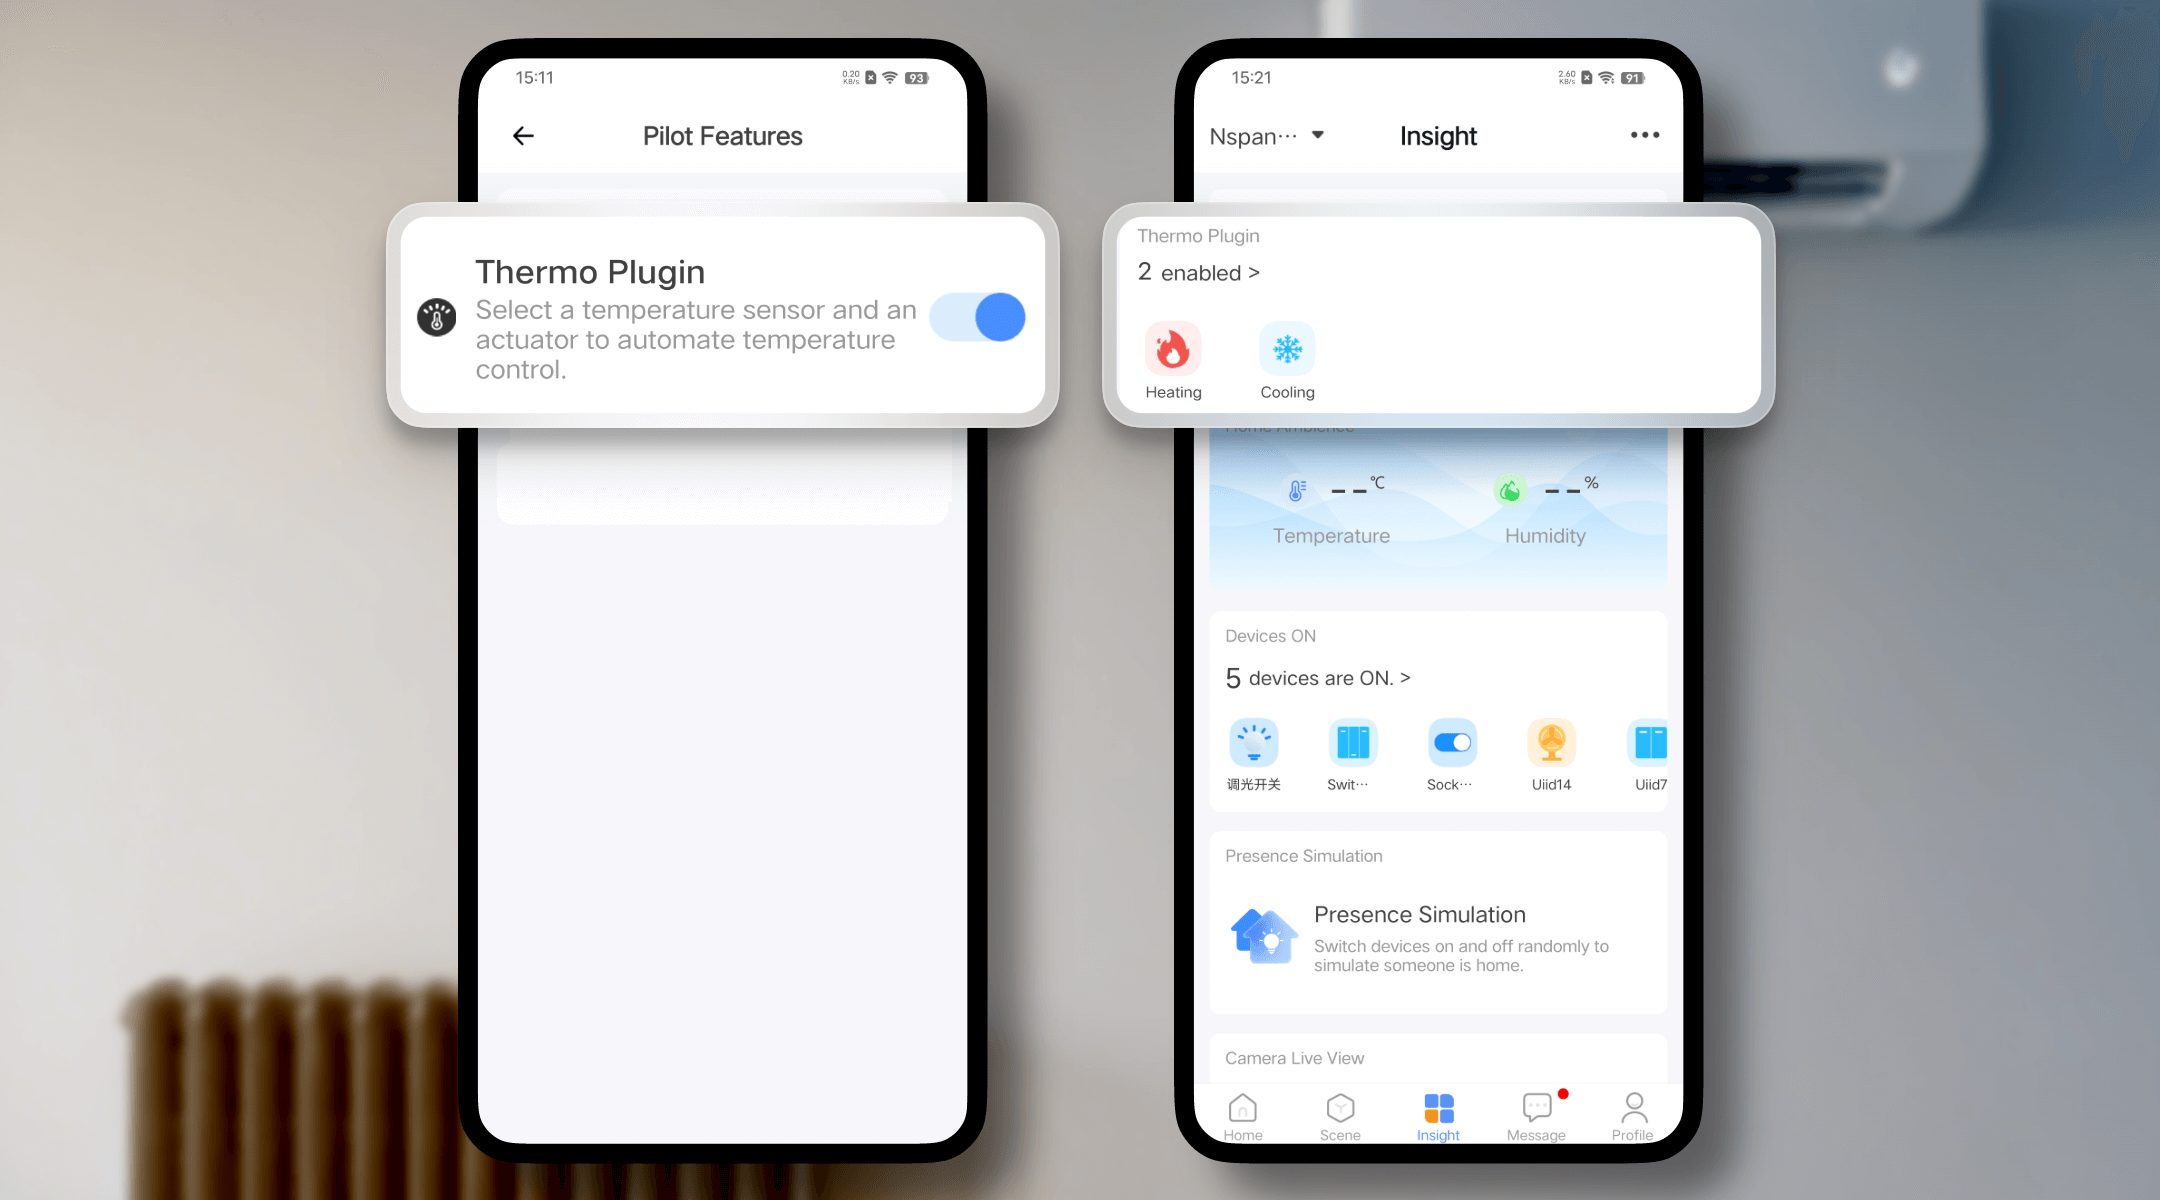
To get started, simply enable the Thermo Plugin from Profile > Pilot Features in the eWeLink App. Then head to the Insight tab to pair a temperature sensor with a smart switch or thermostat and start automating your climate control.
Here’s how it helps solve everyday temperature frustrations—more smoothly than ever.
Solution: Automatic Temperature-Based Control
By linking a temperature sensor with a switch or thermostat, your devices can operate based on real-time readings—turning on only when needed and off when the target temperature is reached.
Example: Keep your bedroom at 26°C during the night. The air conditioner or fan runs only if the temperature rises, helping you sleep without wasting energy.
This smart on/off control reduces unnecessary runtime and energy costs.

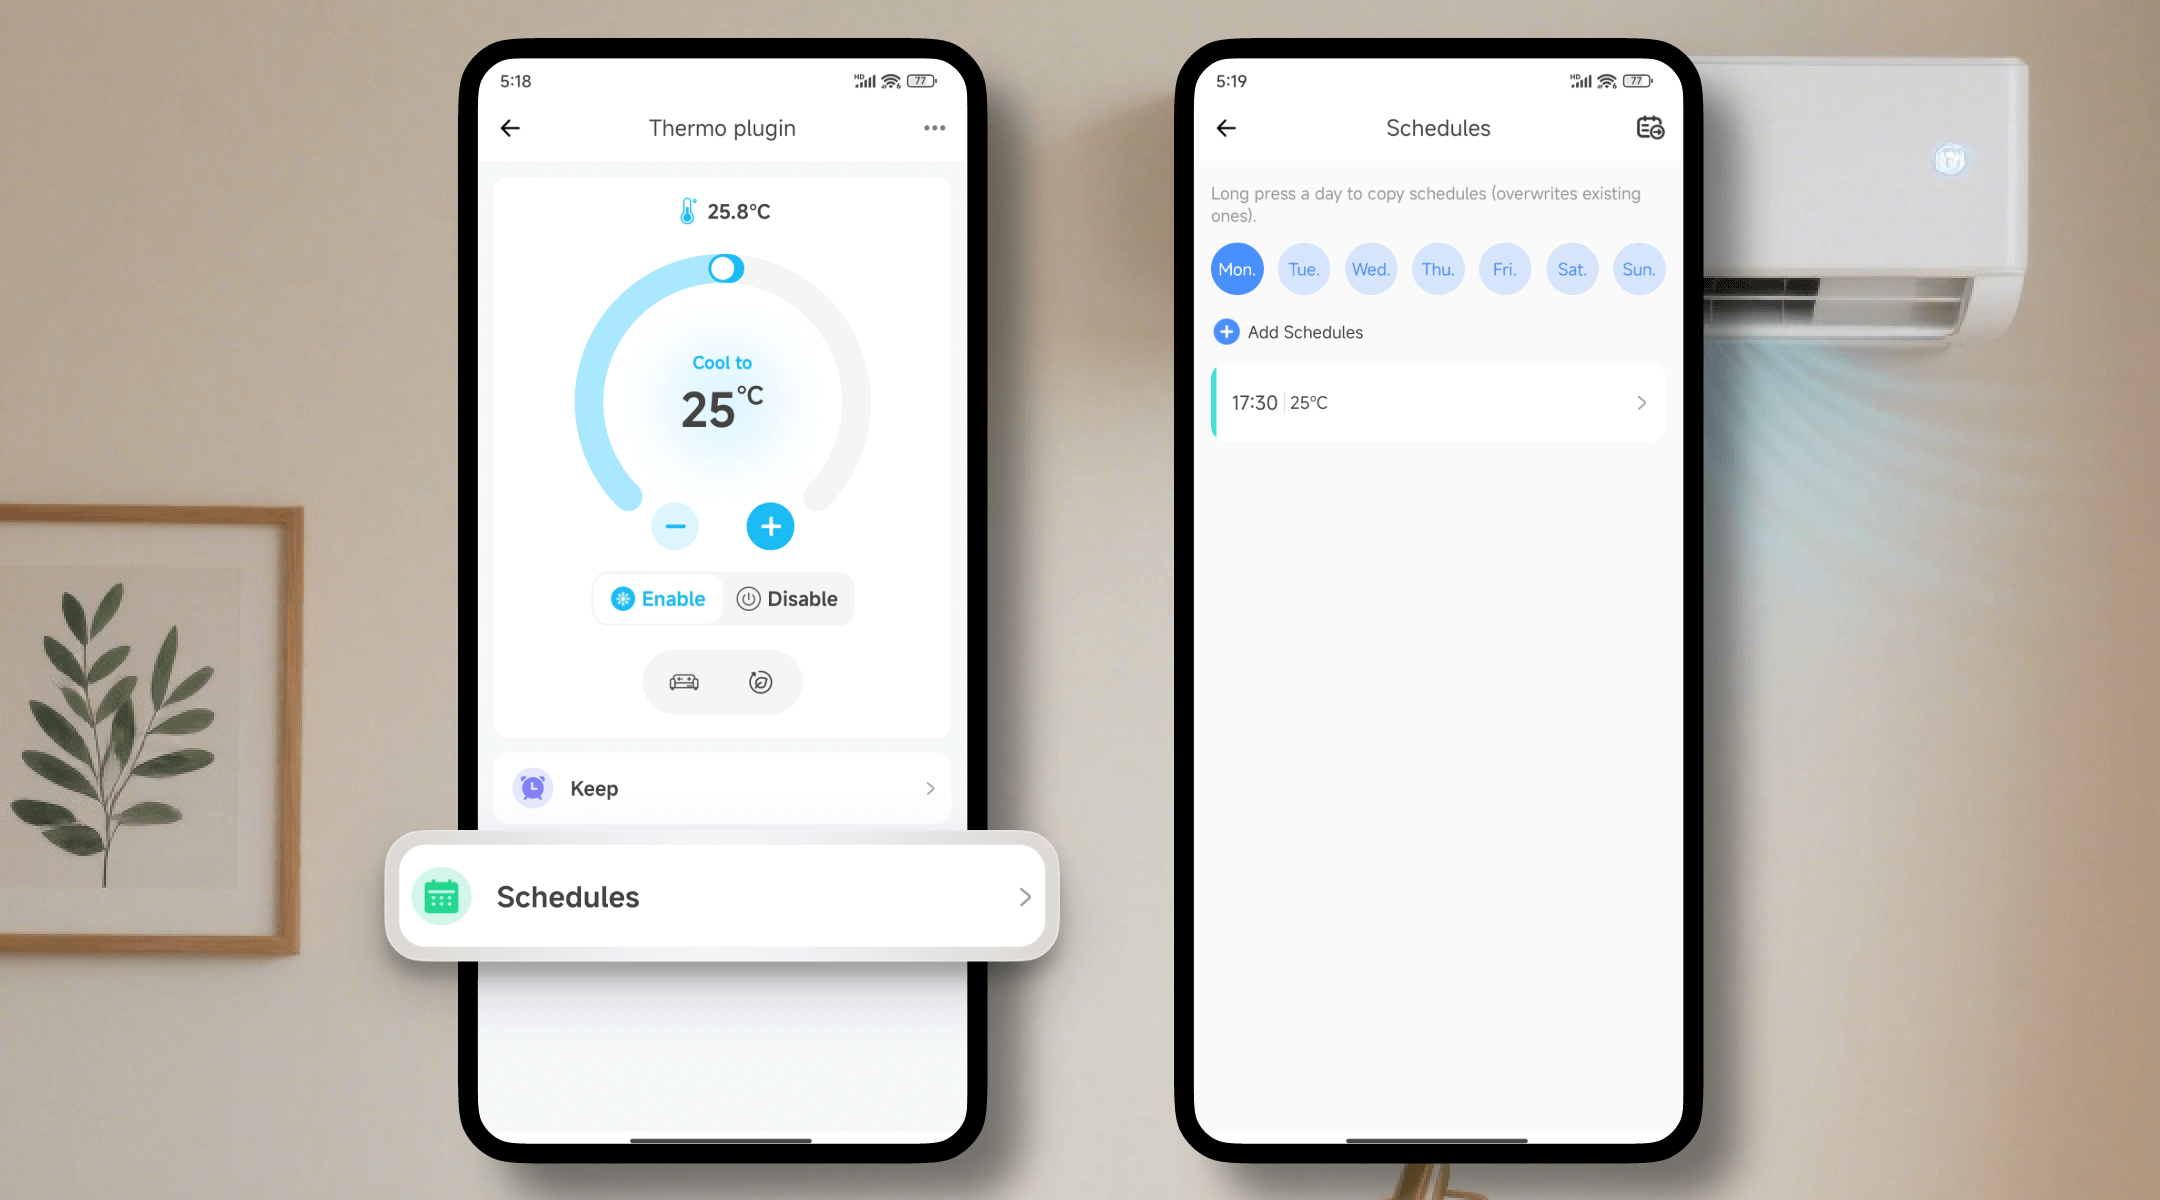
Solution: Scheduled Pre-Cooling or Pre-Heating
The Thermo Plugin allows you to schedule your devices to activate ahead of time, so the room reaches your desired temperature before you arrive.
Example: Set your living room to cool to 25°C at 5:30 PM in summer so it’s just right when you walk in the door.
This kind of temperature prep makes your home welcoming the moment you return.
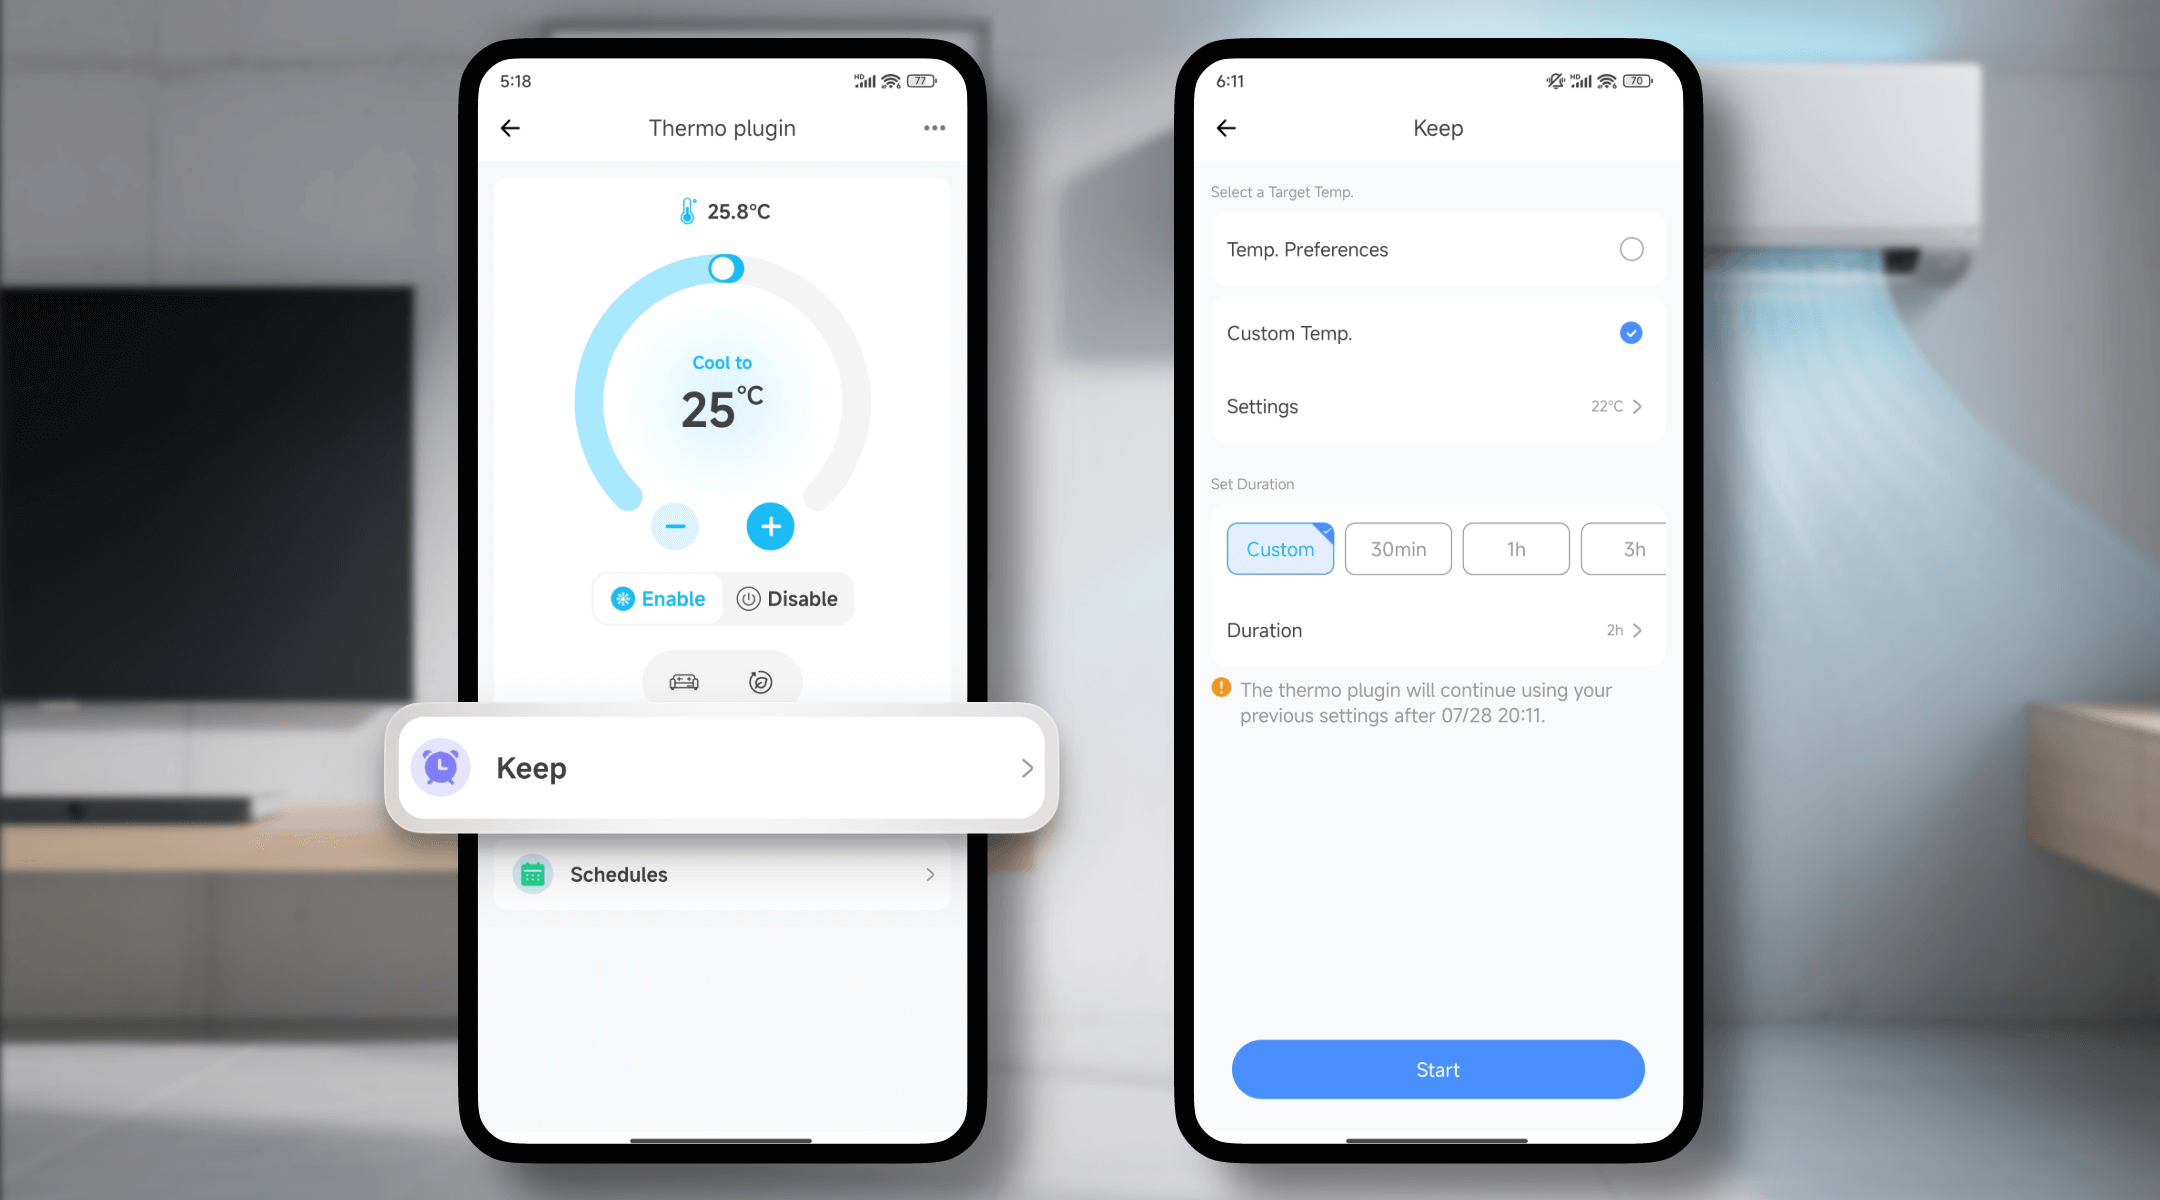
Solution: Temperature Hold with Keep (Advanced Plan)
The Keep function allows you to hold a specific temperature for a defined period of time—ideal for short sessions or routines.
Example: Set your home gym to maintain 22°C for 2 hours during your evening workout.
This way, you get consistent comfort exactly when—and only when—you need it.
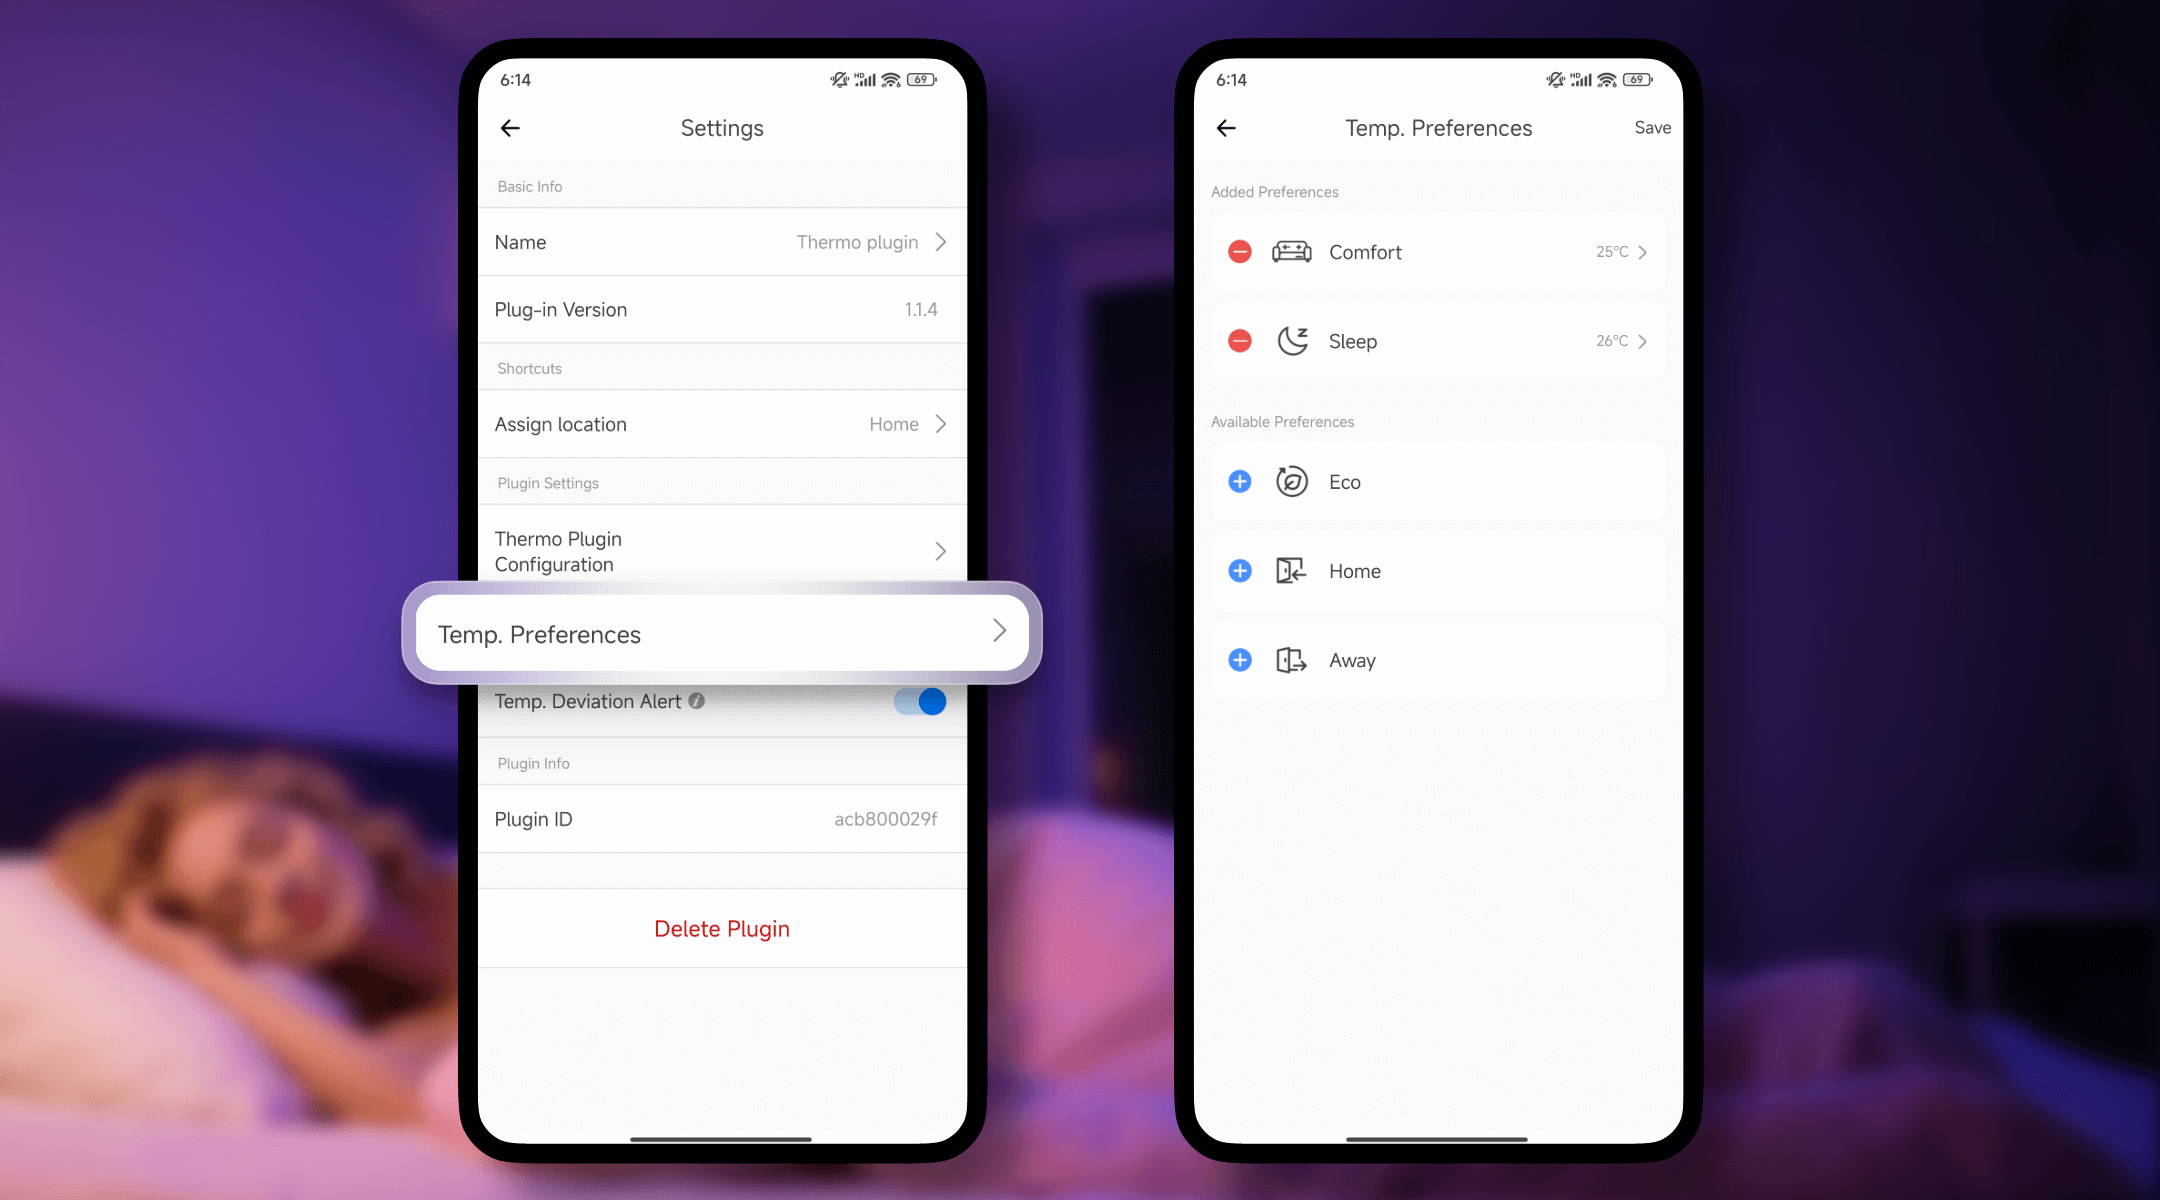
Solution: Customizable Preference Modes
Thermo Plugin offers five ready-to-use modes—Comfort, Eco, Sleep, Home, and Away—and also lets you define your own temperature preferences (ranging from -10°C to 60°C).
Example: Set Comfort Mode to 25°C during the day and Sleep Mode to 26°C at night, all with a few taps.
These flexible options let you tailor your indoor environment to your daily rhythm.
Solution: Scene Integration for Smarter Automation
Thermo Plugin can act as a trigger or action within your custom scenes.
Example:
Ideal for summer days—your room begins cooling the moment someone enters from the garden.
Perfect for summer evenings—once the room has cooled down, unnecessary devices shut off automatically to save energy and reduce noise.

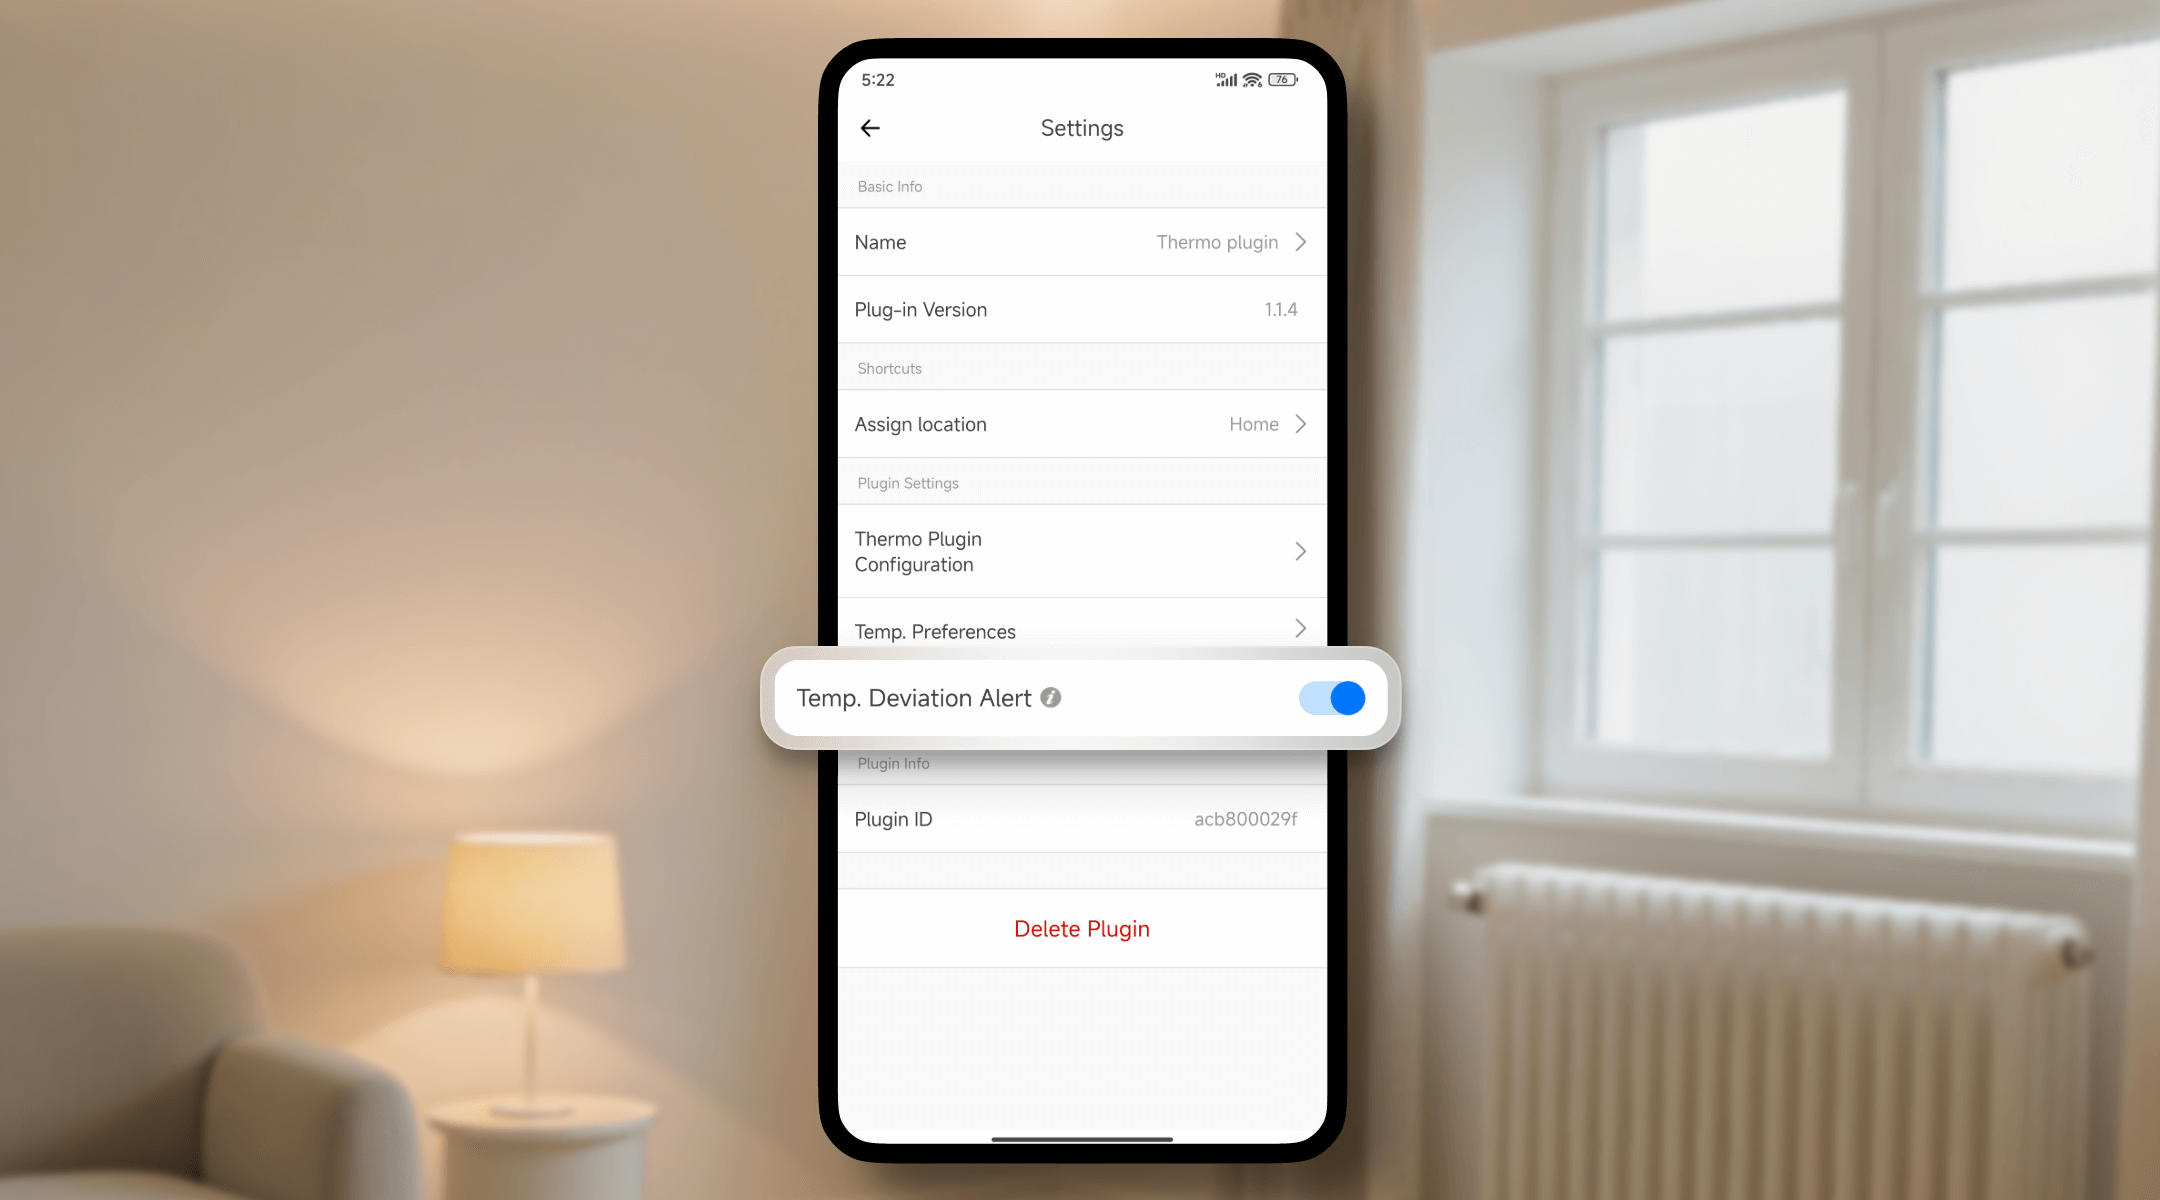
Solution: Deviation Alerts for Unexpected Device Issues
Even with automation in place, issues like device disconnection, device offline, or switch failure can prevent your system from achieving the target temperature. The Thermo Plugin includes Deviation Alerts, which notify you if the current temperature differs from your set point by 3°C or 5°C, helping you catch problems early.
Example:
You’ve scheduled your baby’s room to cool to 26°C, but the smart switch controlling the AC unexpectedly goes offline. The room climbs to 30°C—and you get an alert, so you can step in before things get too uncomfortable.
This alert serves as an essential backup, keeping you informed when automated control is interrupted.
You’re now ready to automate temperature control in your space.
No more guessing, adjusting, or forgetting. The Thermo Plugin makes climate control automatic, consistent, and tailored to your day. Try it today and bring smarter comfort into your home—without lifting a finger.
What important features are we missing? We’d love to hear from you! Join our discussion here.
With the eWeLink app V5.22, Prime members get higher limits for virtual devices, thermostat plugins, and device sharing.
Set up the eWeLink MCP Server to control supported devices with AI using natural-language commands.
With scene names now visible in logs, you can finally connect every device action to the automation behind it.
eWeLink App V5.21 brings smart home control to your Wear OS watch.